Article: How to Remove Wrinkles from Vinyl: Heat vs. Sunlight Methods

How to Remove Wrinkles from Vinyl: Heat vs. Sunlight Methods
Vinyl is one of the most versatile materials out there—whether it’s marine flooring, upholstery, or banners, its durability and flexibility make it a go-to choice. But there’s one thing that can throw off its sleek, polished look: wrinkles and creases.
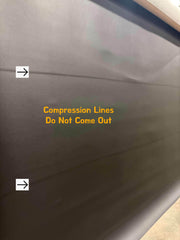
If your vinyl flooring or fabric has been rolled up, stored improperly, or exposed to extreme temperature changes, you may find stubborn wrinkles when you unroll it. Don’t worry—you don’t need to panic or replace it! There are two tried-and-true methods for removing wrinkles from vinyl: heat treatment and sunlight exposure.
Each method has its strengths, depending on the severity of the wrinkles and the type of vinyl you’re working with. Let’s break them down so you can get your vinyl looking smooth and flawless in no time!
Why Does Vinyl Wrinkle in the First Place?
Before we dive into the fixes, let’s quickly talk about why vinyl wrinkles. Vinyl is a thermoplastic material, meaning it softens with heat and becomes more pliable. When it’s stored in a rolled-up position, folded, or placed under pressure for long periods, creases and wrinkles can form.
Common causes include:
✔ Storage Issues: Being rolled up too tightly or stored in a cold environment.
✔ Temperature Changes: Extreme cold can cause vinyl to stiffen, while heat makes it expand.
✔ Improper Installation: If not stretched properly during installation, wrinkles can develop over time.
The good news? Since vinyl is so responsive to heat, those same properties that cause wrinkles can also be used to remove them!
Method 1: Heat Treatment
One of the fastest and most effective ways to remove wrinkles from vinyl is by applying controlled heat. This method works by softening the material just enough to allow the creases to relax and flatten.
Tools You’ll Need:
✔ Heat Gun, Hair Dryer or Steamer – A heat gun or steamer are ideal for heavy-duty vinyl, while a hairdryer works well for thinner materials.
✔ Gloves (Optional) – If handling hot vinyl.
✔ A Smooth, Clean Surface – Preferably a flat area where the vinyl can be laid out.
✔ A Soft Cloth or Roller – Helps to smooth out wrinkles as you apply heat.
How to Do It:
1️⃣ Lay Out the Vinyl
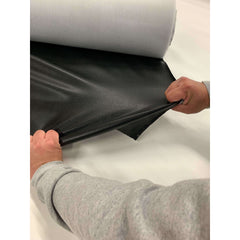
Unroll the vinyl and place it on a flat, clean surface. The more space you give it, the easier it will be to work out the wrinkles.
2️⃣ Start with Low Heat
If using a hairdryer, set it to medium heat. If using a heat gun, start on the lowest setting—vinyl can melt if overheated!
3️⃣ Keep It Moving
Hold the heat source 6-12 inches away from the vinyl and move it in a steady, sweeping motion. Never leave the heat in one spot for too long, or you might cause warping.
4️⃣ Smooth It Out
As the vinyl warms up, gently press it flat using your hands, a soft cloth, or a roller. If dealing with marine vinyl flooring, a vinyl squeegee can help spread out the material evenly.
5️⃣ Let It Cool
Once the wrinkles are gone, let the vinyl sit undisturbed until it cools. This helps it retain its new, smooth shape.
Pros of the Heat Treatment Method:
✅ Works Quickly – Removes wrinkles in minutes.
✅ More Precise – You can target specific problem areas.
✅ Great for Heavy-Duty Vinyl – Ideal for marine flooring, upholstery, and banners.
Potential Downsides:
❌ Risk of Overheating – Too much heat can warp or discolor vinyl.
❌ Not Ideal for Large Areas – Takes time to treat bigger surfaces.
Method 2: Sunlight Exposure ☀️
If you prefer a gentler, low-maintenance approach, natural sunlight can work wonders in relaxing wrinkles from vinyl. This method is especially useful for large sheets of vinyl, like marine flooring or RV flooring, that are difficult to treat with a heat gun.
What You’ll Need:
✔ A Warm, Sunny Day – Ideally 75°F (24°C) or warmer.
✔ A Flat Outdoor Surface – A clean driveway, patio, or deck works well.
✔ Weights or Tape (Optional) – Helps keep edges from curling up.
How to Do It:
1️⃣ Find a Sunny Spot
Lay the vinyl flat in direct sunlight. If it’s a bit stiff from being rolled up, let it loosen up for a few minutes before trying to flatten it.
2️⃣ Secure the Edges
If the vinyl keeps curling up, use weights, heavy objects, or painter’s tape to keep it flat.
3️⃣ Give It Time
Let the sun naturally heat the vinyl for 30 minutes to 1 hour. For thicker vinyl, you may need a little more time.
4️⃣ Smooth It Out
After the vinyl has softened, use your hands to gently press out any remaining wrinkles. If some wrinkles persist, lightly applying a heat gun or hairdryer can finish the job.
5️⃣ Bring It Inside
Once smooth, allow the vinyl to cool in its flat position before installing or rolling it back up.
Pros of the Sunlight Method:
✅ Zero Equipment Needed – Just sunlight and patience!
✅ Safe and Even Heating – No risk of overheating or warping.
✅ Best for Large Vinyl Pieces – Ideal for marine flooring, banners, and upholstery.
Potential Downsides:
❌ Weather-Dependent – Doesn’t work well on cloudy or cold days.
❌ Slower Process – Takes 30 minutes to an hour.
❌ May Require Extra Help – Some stubborn wrinkles may still need a heat gun.
Which Method is Right for You?
✔ Use Heat Treatment If:
- You need a quick fix.
- You’re dealing with smaller, stubborn wrinkles.
- You’re working on marine vinyl flooring or upholstery.
✔ Use Sunlight If:
- You have a large piece of vinyl that’s difficult to heat manually.
- You want a gentle, risk-free method.
- You don’t mind waiting for results.
For the best results, you can combine both methods—start with sunlight exposure to loosen the vinyl, then use a heat gun for any remaining wrinkles!
Final Thoughts
Wrinkles in vinyl can be annoying, but they don’t have to be permanent! Whether you speed things up with heat treatment or let nature do the work with sunlight, both methods are effective in restoring vinyl to its smooth, wrinkle-free state.
No matter which method you choose, just remember: vinyl loves heat—but too much can damage it. Always apply heat evenly, be patient, and let the material cool flat to retain its shape.
Now, go get that vinyl looking brand new!


Leave a comment
This site is protected by hCaptcha and the hCaptcha Privacy Policy and Terms of Service apply.